Monday, December 23, 2013

Merry Christmas Applique


Christmas Blessings to Everyone!

Border View
A Glimpse of the whole quilt.
It is large, 88 X 110
Pear Tree Block
"and to all a goodnight"
This quilt both challenged and delighted me - It was so much fun to work on! Thank you, dear one, for giving me the opportunity! It took me a long time to complete it, (the results were well worth the time!) and I was so attached to it by the time it was finished that I did not want to give it back! The pictures do not do this justice, but wouldn't you just love to have this one displayed in your home during the wonderful holiday season?
Center "Merry Christmas" block

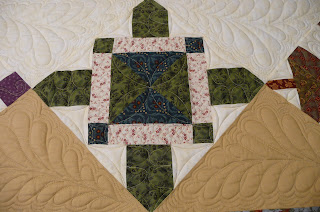
Star block
I am often asked how I decide what to quilt. There is not an easy answer to this, but basically, this is how I typically work. While I am working on a quilt, I hang my next one on a clothesline near my machine so that I can look at it every time I walk into the room or glace up. It keeps me thinking, and little by little a plan begins to take shape. I look for clues within the quilt to guide me - allowing the quilt to "speak" to me. This will extend from what colors to use (I find myself often trying out various colors) to what I might do in each block, section, sashing, border, etc. For a quilt like this one, I find myself thinking: " If I were a (holly, stocking, leaf, ornament, star, menorah, etc.) how would I look? Or, what background fill would look best here? I am more of a traditional quilter, although I do modern quilts as well, so most of my ideas have more of a traditional theme.

Wreath Block
By the time I am ready to work on the quilt, I have sticky notes pinned all over it to remind me what I was thinking. (With my feeble mind, the notes are vital!) This also helps me keep a consistent flow to the quilt, since I can only see a small portion of it at a time.


poinsettia block


Menorah Block
That's it - not much of a secret, is it! But, it is what works for me. As you can see in this quilt, there are all kinds of stitched additions - oak leaves added to the border pattern, ribbons added to the wreath and stockings, flames added to the menorah, star "light". There is also quite a variety of fill patterns: echo quilting, swirls, paisley, feathers, curls, etc.


May each of you and your families know the most blessed gift of all this Christmas.
"Thanks be to God for His indescribable gift!" (I Cor. 9:15)

Tuesday, December 10, 2013

Blue Marking Pen

Happy Holidays, all you quilters!

My baby is down and I am waiting for parts (not the best thing to happen at this time of year!) so I thought I would supply you with one of my tips this week. Many of you (mainly you applique-ers)  have asked how I get out those blue marks that are supposed to disappear simply by  wetting the quilt. I have found that water by itself does not always work, so this is what I discovered some time ago - I am not sure where, but I may have found this tip in one of Linda Taylor's books.

To 16 oz. of distilled water, add 1/2 teaspoon of baking soda. As you can see, I have this solution in a spray bottle to use as needed. I have yet to see this not work. I keep my spray bottle labeled with the formula, since so often my mind takes too long to wind its way around to what I am trying to remember.

Sometimes the marks are close to an area of possible bleeding fabric. (Red and purple are usually the worst, but if you are in doubt, test a sample of the fabric wherever possible by lightly dampening it and then blotting it with a white cloth. If there is any color on the cloth, it WILL bleed.)

 I try not to get to close to these areas with my original marking just to avoid any problems. However, when this is the case, I dampen a sponge with the solution and then  carefully dab at the blue marks. Do not go any closer than necessary to the suspect fabric to avoid any possible bleeding.

I hope this helps out some of you. In the meantime, I will try not to get too frustrated with my backlog while I am waiting for parts, and hope that when they do arrive, my husband and I will be able to get Louise going again!

Happy Quilting!!

Sunday, December 1, 2013

A Christmas Sampler

Happy December!
 
We really enjoyed our Thanksgiving, and I hope you enjoyed yours as well. Holidays are such a wonderful time for family gatherings, but unfortunately, our family is so scattered that we were not able to get everyone together. As a replacement, our wonderful daughter sent this photo, and I just had to show off two of our cute grandchildren! (Our daughter Sarah with Samantha and Emily)
 
 
As for that Black Friday shopping, I don't know about you, but I chose not to brave the shopping the last couple of days and decided to remain in the safety of my home. I enjoy Christmas shopping, but I certainly do not want to be around crowds of crazy people who are in a trampling mode!
I love this time of year - the music, lights, family fun, children's pageants, laughter, decorating, baking, etc. I love most of all to watch children's faces - they are all so full of wonder, joy, and excitement - which is really what Christmas is all about. After all, the very first Christmas gift was a child, so it is only natural that children should be the most excited.
 
A Christmas Sampler Quilt
For me, this time of year also means lots of quilting, so here is a Christmas sampler for you to check out.
The Poinsettia Center block


A sample block - Path Through
the Woods - with continuous
curveand feather swirls

Christmas Star  block


The quilt border as a busy fabric, so the pattern would be hard to see. This is the back of the quilt, which allows you to see the Ivy pattern, and some of the feather sashing. 
I really enjoy working on samplers, and this one was no exception. Some of the block patterns in this quilt I had not seen before, and sometimes it was a stretch for me to determine what to quilt, but I do so enjoy the process!
 
Well, its time for me to get to wrapping all those gifts that have to go into the mail. Have fun with your Christmas projects - I am sure all who receive them will be delighted with the special effort you have put into them. Enjoy the season!!!  
 
"...and unto us a child is born, a son is given, and the government will be upon His shoulders; and His Name will be called Wonderful Counselor, Mighty God, Eternal Father, Prince of Peace."  (Is. 9:6)


Wednesday, November 13, 2013

Pantographs

"He Loves Me" flower pantograph
What is a pantograph? A pantograph is a continuous line pattern that a machine quilter uses to guide the quilting machine.  This type of quilting is also known as "edge to edge" or "all-over" quilting. It is stitched in rows from one side of the quilt to the other, and is repeated in an interlocking format from one row to the next, until the entire surface has been quilted.


"Bauhaus" a more contemporary pattern


A quilted pantograph is 
"Merrily Feathers" one of the
many feather pantographs


"Double Bubbles" - a fun
 and contemporary design
 which looks great on
 strip quilts.


"Starburst" a swirl
pattern
not only beautiful, it is the most affordable and quickest way to have your pieced top professionally machine quilted. There is a huge range of categories for this type of quilting: flowers, leaves, animals, butterflies, fish, abstract, sports, children's designs, feathers, swirls, western, music, and more, both contemporary and traditional designs - and there are literally hundreds of them out there.

"Angel Wings" a versatile pattern for
all types of quilts.
Many of these patterns work well for any type of quilt. I have shown just a few here to give you the idea. If you have not considered this type of quilting before, perhaps this may be just what you need for that top you are working on!

"Baptist Fan" a much loved and
 asked for traditional design.


Sunday, November 3, 2013

Totes, etc.

I cannot believe it is November already - I am once again in a panic because, like you, I know Christmas is right around the corner. I am working down my Christmas list every spare moment I have, and thought I'd show you a couple of the completed items on my list. (Notice I said completed - there are still a few to go!!)

Tote bags make great gifts, and these were really easy to make. I always like lots of pockets in my totes - makes it so much easier to find things - and these have a total of 10!) This pattern is "The Max Bag" by Dixons Designs, and uses grommets to hold the handle. I had not done this before and was truly surprised by how easy they are to install.


I have an affinity for cat fabric, and when I found this Laurel Burch fabric I thought it would make the perfect bag for one of the cat lovers on my list. This is "The Melanie Bag" pattern, designed by Patricia Minich. It has zippers, so it was not as easy as the totes, but still not difficult. (Trust me - if I can make it, it is not complicated!)
Well, I still have a lot of gifts to make, so I guess I better get to it - but I think I will go for a walk first. There will not be very many beautiful fall days like today! Happy Fall, everyone!

Sunday, October 20, 2013

Midnight Garden Sampler

Midnight Garden Sampler

I love sampler quilts and enjoy working on them. What makes quilting them so time consuming is that each block needs it's own design, but the finished piece must work as a whole. This sampler was a mix of various shades of brown and turquoise, which made a stunning "garden."


Looking at the border, I decided the brown needed a little softening, so I used a turquoise thread and a spiked swirl pattern like a fill. The smaller inner borders I quilted as one unit in an alternating swirl pattern. I like to vary my textures so that there is both heavy and light quilting throughout the quilt. This adds more interest to the overall look and makes some parts of the quilt stand out more than others.


The blocks need some cohesion to them, so I like to use similar quilting to tie them all together. In this case, since all the centers were the same star shape and size, I quilted them with the same pattern - a combination of continuous curve and
cathedral window.
The blocks were of 3 basic styles. I used continuous curve in the triangle and square background areas (curved lines that go from point to point), swirls in other areas, and pointed ovals to look like buds in the flower areas. I hope you can see this in the blocks I have shown here.
Even though similar designs are used, each block has a different look, but the overall look of the quilt is cohesive. I always liked the way the triangular and flower areas came out.

For the background area, I wanted something tight so that the blocks would stand out, so I used a paisley fill. This swirly pattern was a nice contrast to all the points of the blocks, and allowed the block patterns to come forward. The finished quilt at the top of this post is the finished result.


Friday, October 11, 2013

Flood Quilts

The recent flooding here in Colorado left many without homes and many others with major clean up and loss. Our home was not affected, but our hearts go out to the many that were. There are many photos online, but I have included one here, just to emphasize what so many have experienced.


When I walked into Sweetheart Quilt Shop a couple of weeks ago to pick up something I was in need of, I walked out with my arms full of quilt tops that needed to be quilted. These tops were made by generous quilters who have worked to provide something special for the many victims of this flood.

Below are a couple photos of some of these quilts. The goal at Sweetheart is to obtain 500 quilts to be donated to those affected. If you have not already done so, I would encourage you to stop in to their shop to see how you can help out.


May the Lord bless each of you who so generously contributed time and resources to this project!

"Truly I say unto you, to the extent that you did it to one of these brothers of Mie, even the least of them, you did it to Me." (Mathew 25:40)


Tuesday, October 1, 2013

My New IQ

Louise with IQ

 
I installed an IQ computer on Louise 2 weeks ago, and am learning how to use it. I have been having fun playing with my new toy.


My first task was to learn how to do edge to edge (or pantographs) with my new toy. This is my first computerized pattern that I did on a charity quilt. The quilted pattern is called double bubbles, and is a great look for all the lines of this quitl.


My next task was to figure out how to get all of my paper pantograph library onto my computer. To do this, I had to "record" my pattern - allow the computer to take what I am sewing and digitize it.
This is my first attempt at that, on another charity quilt. Since the quilt was paper dolls, I thought this pantograph pattern called "Children" was perfect for it.


Saturday, September 28, 2013

S's Kaleidoscope Symphony

 
This was a fun sampler quilt that I recently completed quilting. I loved the colors in it, and since it is a kaleidoscope quilt, every center is different. (The pattern is by Marilyn Foreman.)


 Some feather detail in the triangle insets.
One of the kaleidoscope blocks. I hope you can see the quilting detail in this block.

Saturday, September 21, 2013

Adding Borders

Adding Borders to Your Quilt:

Note: all measurements should be taken from the body of the quilt, away from the edges, near the top, center, and bottom.

1) Whenever possible, cut your borders lengthwise from the fabric instead of widthwise. This will prevent stretching distortion.

2) Determine the length of the quilt by taking a measurement in 3 places and taking the average (add the 3 measurements together and divide by 3.)

3) Cut two borders to the above average dimension. Find the center of the long side of the quilt and the center of each border - pin the border to the quilt at the center and the two ends. Continue pinning, easing in any fullness as necessary to make the quilt and border fit to exactly the same dimensions.

4) Pin, sew, and press.

5) Repeat with the opposite sides of the quilt.

A video you may want to watch: http://www.youtube.com/watch?v=F1CuzT9nMCw

Preparing a Quilt for Machine Quilting

Note: Proper preparation of your quilt top will result in a better finished quilt and can save you money. 

· Remove any selvage edges from your quilt and backing. Selvages are thicker than your fabric and will cause distortion in your quilt.

· Press quilt top well (from the back side of the quilt), making sure all seam are properly pressed.  Proper pressing during quilt construction will make the final pressing simple to do. (Quilt top must be clean, pressed, and threads clipped.)

· Backing seams should be pressed open.

· Batting and backing must be at least 6—8 inches wider and 6—8 inches longer than the quilt top. (This would be 3—4 inches larger than your quilt all the way around.)

· Check for any loose threads or open seams. Trim as many threads as possible from quilt top and back. (Note: dark threads can show through the quilt top in lighter areas. Holding your quilt top up to a light will help you to see these better so they can be trimmed.)
Stay stitch around top and/or backing where there are open seams to prevent the seams from becoming loose while quilting.

· DO NOT baste or pin the quilt layers together—this in not necessary for longarm machine quilting since each layer is loaded separately onto quilt rollers.

· DO NOT add any embellishments to the quilt until after it is quilted.

· If your quilt and/or quilt back is directional, make sure you indicate this by pinning a note to the top of the quilt and/or backing.

· Fold the quilt top carefully.

Tuesday, September 10, 2013

My Nolting Longarm


Louise
This is a my Nolting longarm system, which I have set up in what I call the "boiler room", since it is in the unfinished part of our basement with the water heater, furnace, etc. (It's the only place we could find big enough to put it!)


Civil War Tribute Quilt

K's Civil War Tribute Quilt 
K's quilt

This was one of my very first major quilting projects when I first began quilting for customers.

The border area, with feathers quilted in the triangle areas.

The center medallion area. Continuous curve in the star area, with dahlias and feathers quilted around.
Below are other block areas with more feather detail.